


DIY Cuckoo Clock | Crafts for Kids
Posted by Bavarian Clockworks on 16th Aug 2016
A cuckoo clock is a pendulum-regulated type of clock that creates an hourly cuckoo sound and a popping cuckoo bird. Crafting a DIY cuckoo clock can be a fun challenge that will stimulate your creative juices and can serve as an exciting do-it-yourself project to do with your kids.
Though building a coo coo clock may sound a bit advanced, this tutorial will walk you through step by step.
So what are you waiting for? Start gathering the materials from the list below and lets start creating a beautiful DIY clock!
Material List
Required materials for this DIY project:
- Several colors of crafting felt
- The clock mechanism from an old wall clock or alarm clock
- A cardboard from a used box
- A ruler
- A pencil
- A cutter or an X-acto knife
- A pair of scissor
- A pair of small, pointed-end scissor
- A yarn of any color
- A crochet thread
- A long nose plier
- A soda can tab
- A hot glue
The process of this do-it-yourself (DIY) project was divided into three major parts: Building the cuckoo clock’s body or the birdhouse, Adding the clock mechanism, and Designing the cuckoo bird and clock weights.
Your daughter or son can help contribute throughout the entire activity, however incorporating the clock mechanism can be a bit tricky so you might have to handle most of those steps.
Building the Cuckoo Clock Body
Step 1: Do some measurements for the front face of the cuckoo house on a piece of cardboard. Draw a right triangle on the upper one-third of the rectangle that would serve as the roof part of the house. The measurements used for this one are the following: Length=17.5 cm; Height=24.5 cm (rectangle in portrait orientation) and the length of the right triangle=12 cm. Start measuring the ends of the right triangle on the height of 15.5 cm from the bottom.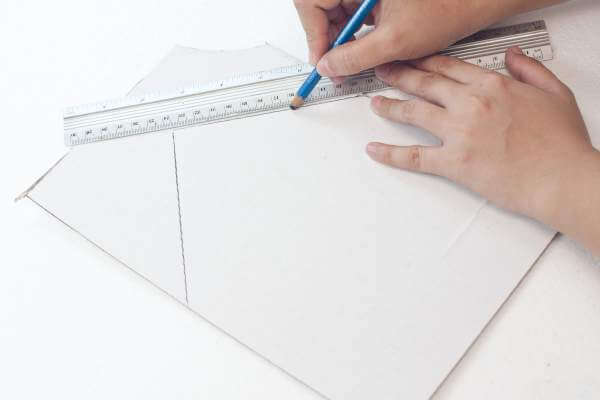
Step 2: Repeat step #1 so you have two identical pieces of cardboard. This is the front and the rear face of the house.
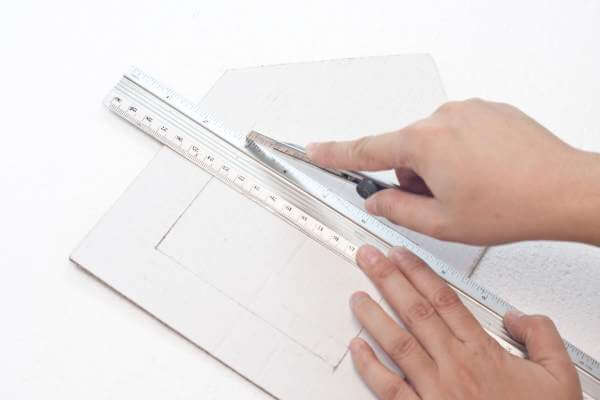
Step 3: Draw and cut two rectangles that are 15.5 cm in length and 7.5 cm in width. These two rectangles are used to cover the sides of the cuckoo clock house.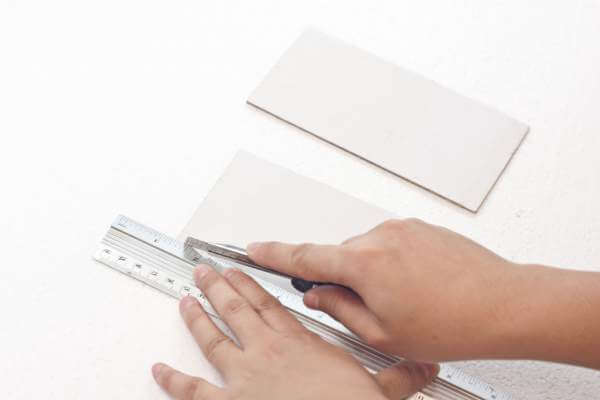
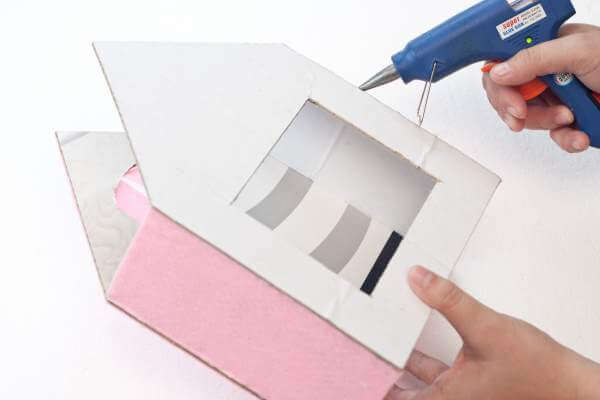
Step 4: Draw a window on the upper middle portion of the front face of the house using a pencil, then cut a window hole based on the drawing made.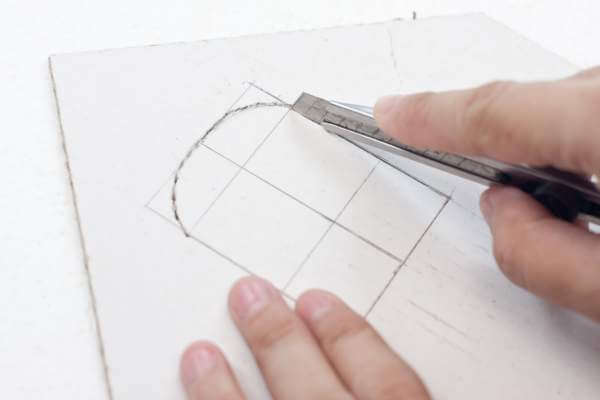
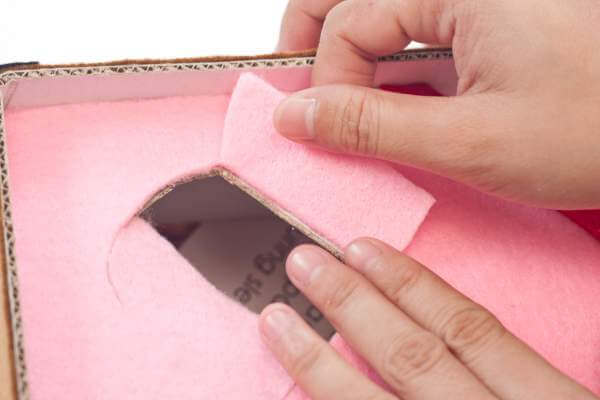
Step 5: Create a hole in the middle bottom part of the front face cardboard using a sharp pointed object (e.g. a pair of a scissor). This is where the clock mechanism will go, so make sure the hole is big enough.
buy 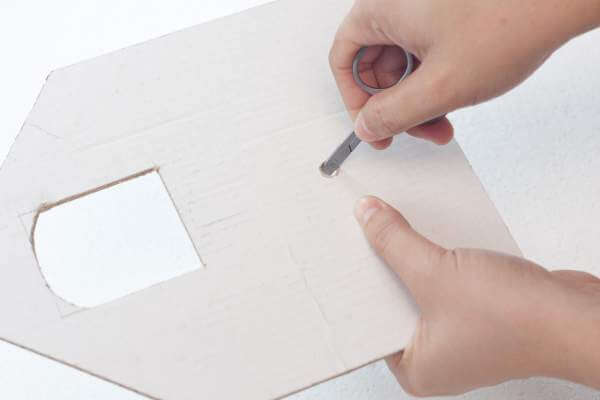
Step 6: Cut a medium-sized rectangle at the middle bottom part of the rear face cardboard. It will serve as an access to the back portion of the clock mechanism whenever you change the battery of the clock.
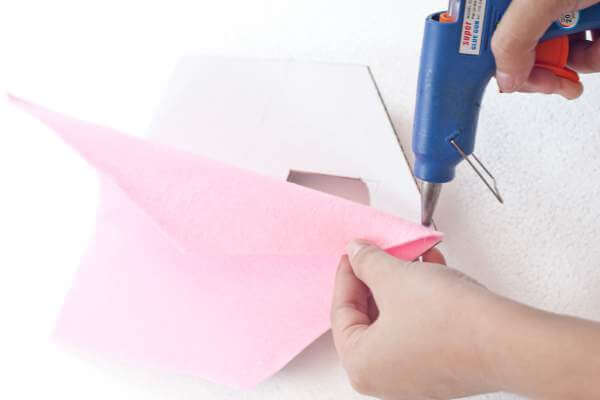
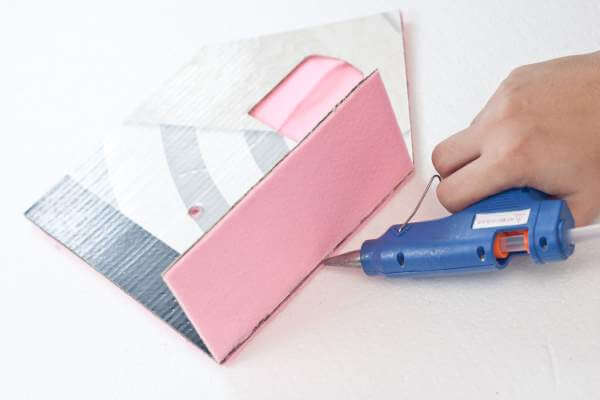
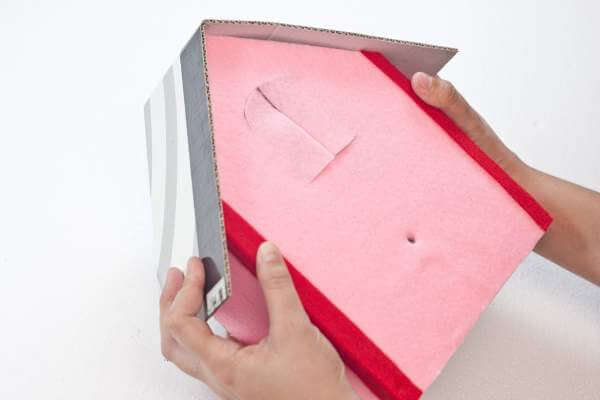
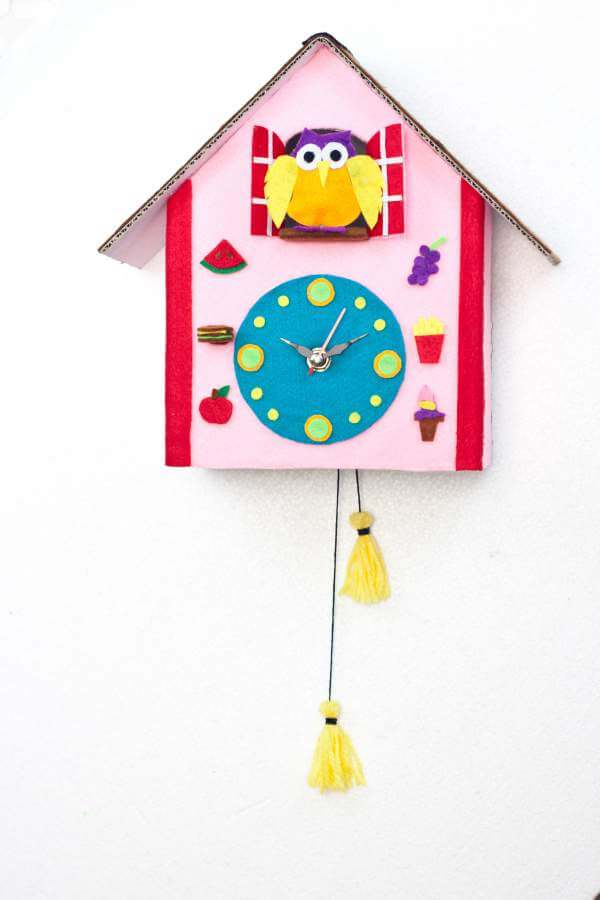
Step 7: Measure and cut the crafting felt for the body of the front facing cardboard (ie. the one with the window). We used a pink crafting felt for this project, but you may use whatever colour you wish.

Step 8: Glue the crafting felt on the cardboard, then trim the excess felt hanging off the sides. You want it to be exactly the same size, no overhang.
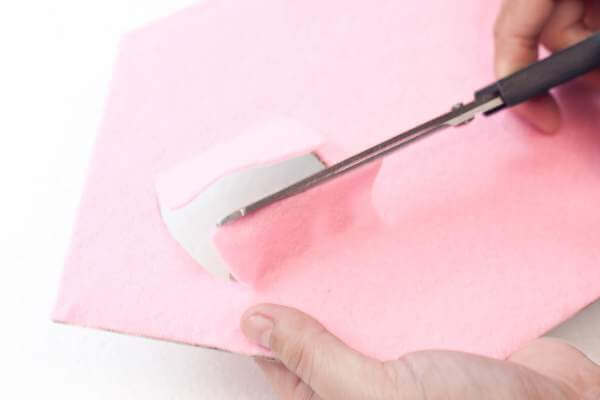
Step 9: Cut an opening for the window, but make sure that the crafting felt will look like window shutters.
Step 10: Cut and glue the same crafting felt that was used to cover the front, to the two rectangular cardboard pieces.
Step 11: Generously glue one rectangle on the side of the front face cardboard. Repeat on the other side.
Step 12: Glue the rear face cardboard to the two rectangular cardboards to close in the structure of the cuckoo house.
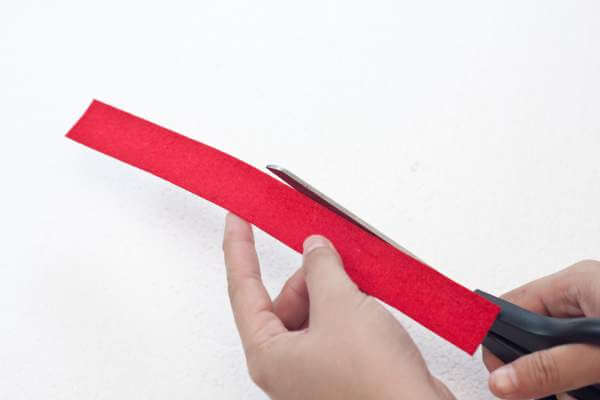
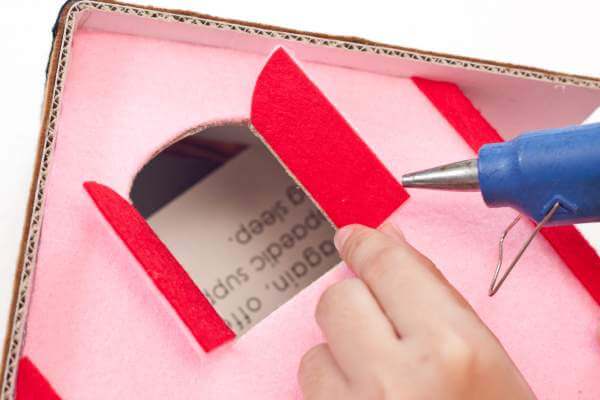
Step 13: Cut 2 red felt strip with a width of at least 3 cm, and the height of the side panels of the cuckoo house.
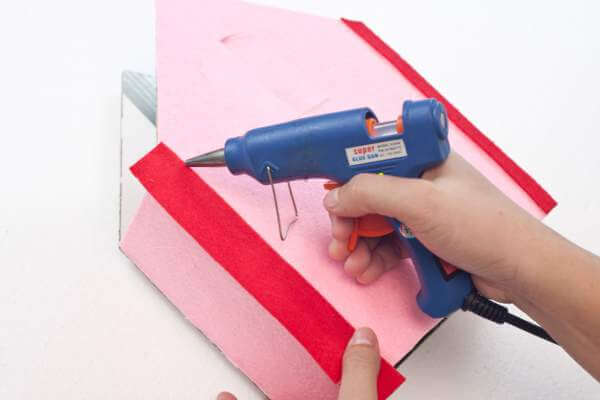
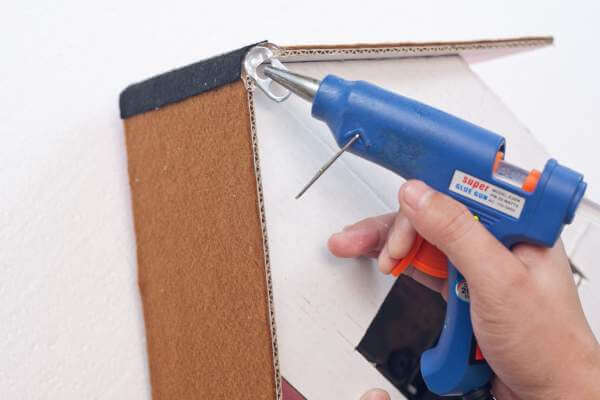
Step 14: Glue the red strips to wrap the FRONT corners of the house. These strips will emphasize the posts of the house and will further accentuate the overall features of the cuckoo clock.
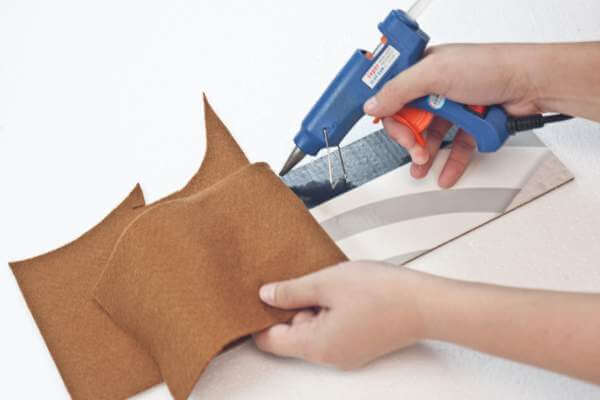
Step 15: Cut another piece of a rectangle from the remaining cardboard to create a roof for the house. Take the actual measurement using a ruler and use this as a reference to cut the rectangular roof. Fold the rectangular cardboard in the middle and try it on the house if it fits well. You will want a little overhang on the sides and along the front of the cuckoo house, but not very much on the rear.
Step 16: Cut and glue a piece of brown crafting felt on the cardboard roof. Trim any excess felt hanging over the edges.
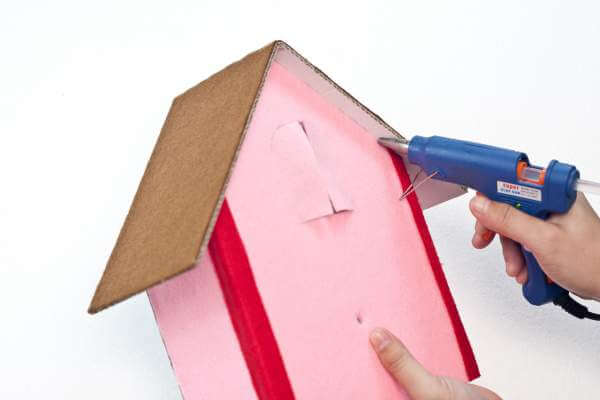
Step 17: Place and generously glue the roof on top of the house.
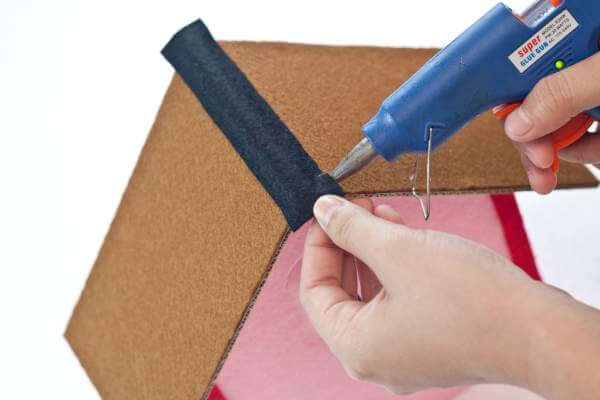
Step 18: Cut a strip of black crafting felt that is at least 3 cm in width. Hot glue the black strip along the peek of the roof.
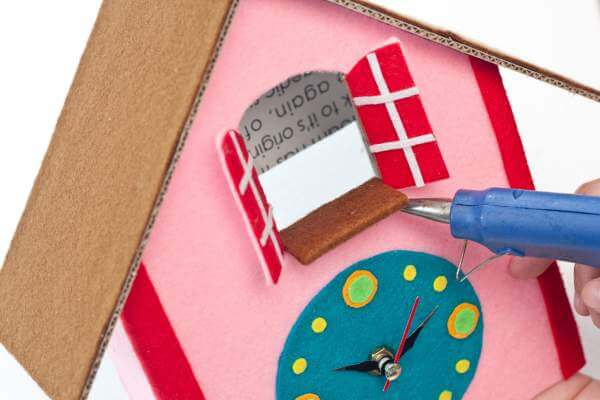
Step 19: Run a thin glue on the hinges of the felt flap on the window. This will keep the windows partially open. Do this on both sides of the window.
Step 20: Cut a piece of red felt that will fit on the inside of the window shutters. Glue the red felt pieces on the pink flaps of the window.
Step 21: Add details on the window pane. Cut thin strips of white crafting felt and permanently place it on the window shutters using hot glue.

Incorporating The Clock Mechanism
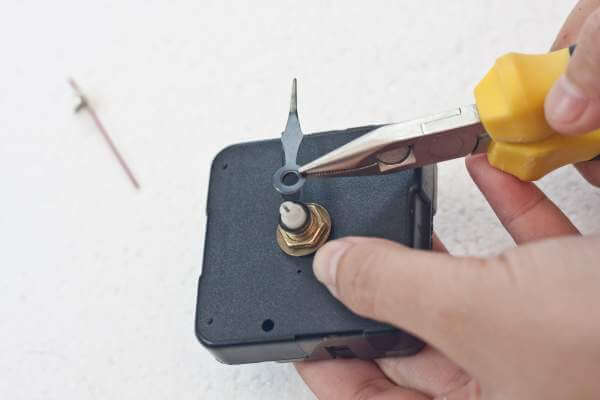
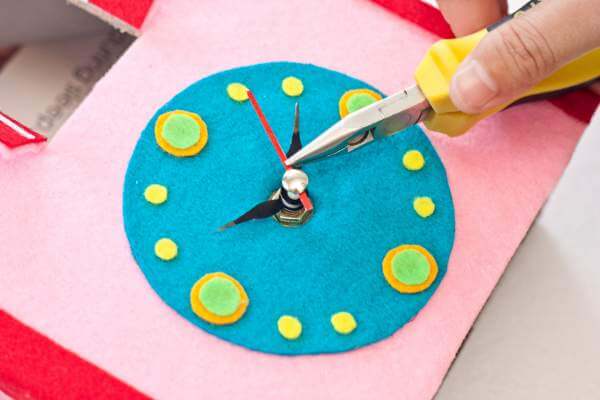
Step 1: Carefully remove the hands of the clock from its mechanism using long nose pliers. Remove all the nut screws in the middle that serve as the holding structure of the whole clock to the body.
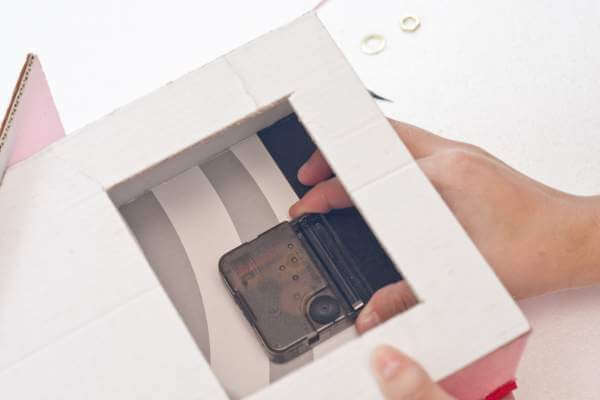
Step 2: Insert the clock mechanism body at the back of the hole made in the front face of the house.
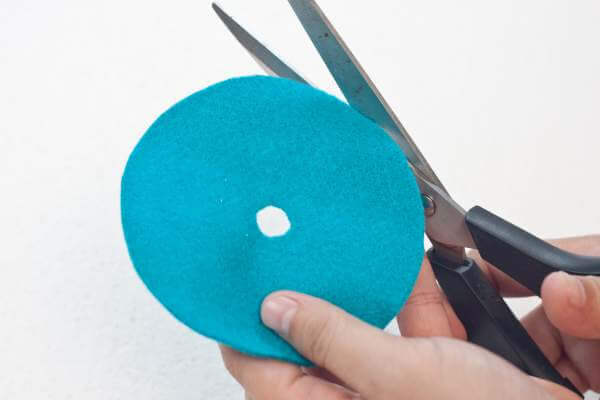
Step 3: Cut a medium-sized circle from a blue-green crafting felt that could perfectly fit at the bottom part of the house that is provisioned for the body of the clock. Create a circular hole in the middle to give way to the hands of the clock.
Step 4: Place the circle felt and lock the clock mechanism in place by placing the nut screw on the protruded part of the clock mechanism.
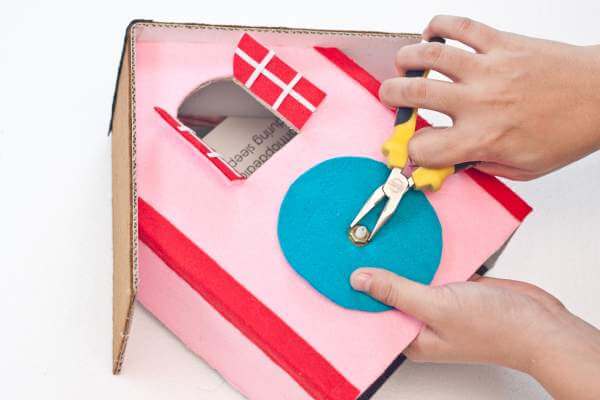
Step 5: Glue the circle crafting felt into place. This will serve as the clock’s face.

Step 6: Cut four orange circles and four smaller green circles. Glue the small and the big circle together. These circles will represent the 3, 6, 9, and 12 digits of the clock. Glue them onto the clock face in their respective positions.
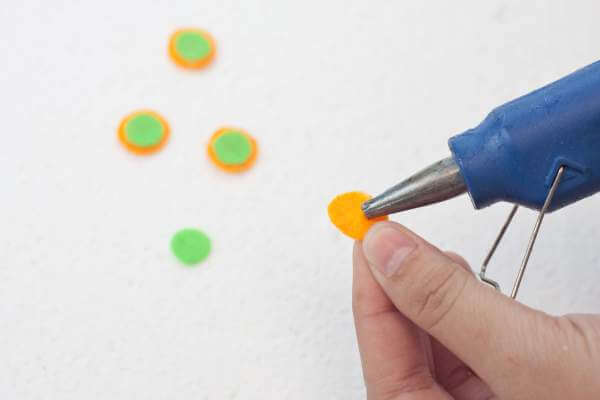
Step 7: Cut eight pieces of small yellow circles and glue two pieces of it in between the big circles. These circles will represent the 1, 2, 4, 5, 7, 8, 10, and 11 digits of the clock face.
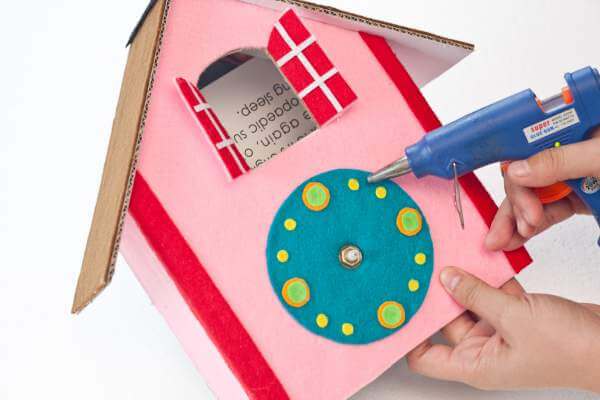
Step 8: Carefully return the hands of the clock on its mechanism.
Designing the Cuckoo Bird and Clock Weights
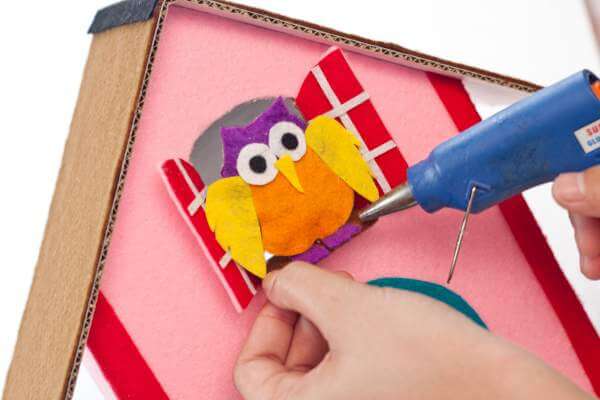
Step 1: Cut a small piece of a rectangle that can fit in the window. Cover the small rectangle with a brown felt since this will serve as the cuckoo’s standing platform later on.
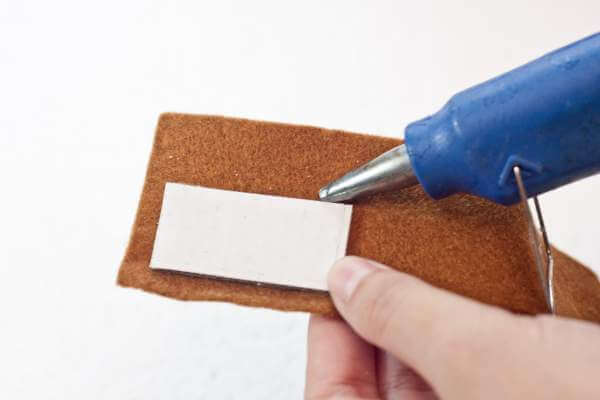
Step 2: Glue the standing platform on the bottom portion of the window.
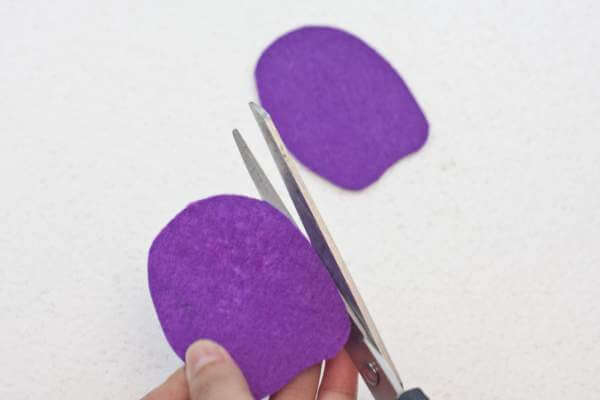
Step 3: Cut two oblong pieces from the purple crafting felt. This is the cuckoo’s body. You may opt to use other colors if you wish.
Step 4: Line a thin glue on the sides of the oblong and put the two oblongs together. There should be an opening and a reasonable amount of space in the middle portion of the oblong for the filling to be placed inside.
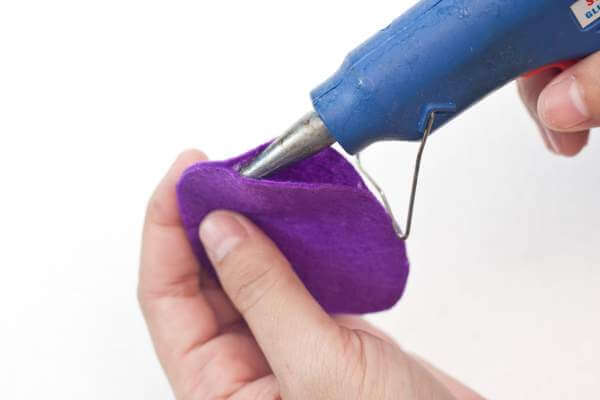
Step 5: Cut the scrap felt pieces and place it in the cuckoo’s body. Seal the opening with a thin line of glue.
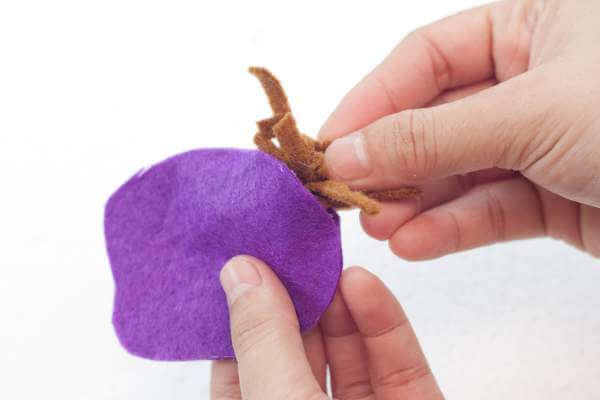
Step 6: Add details to the bird. Cut a pair of wings, a pair of eyes, nose and a pair of legs and glue it on the body afterward. Use different colors of crafting felt and be creative!
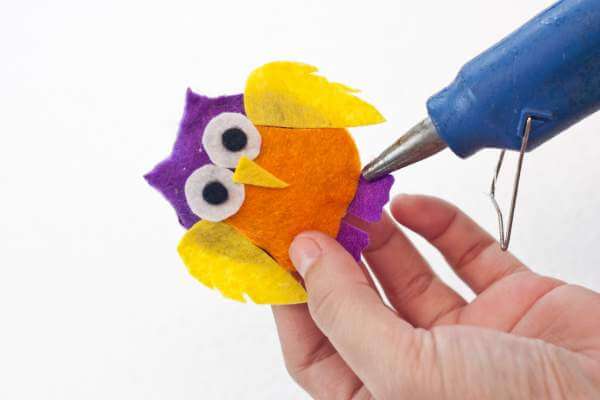
Step 7: Glue the bird on the small platform in the window.
Step 8: Create small pieces of crafting felt foods. These can be your kids’ favorite foods and it could be anything from apple, ice cream to grapes. etc. --> Glue the miniature felt foods on the sides of the clock.
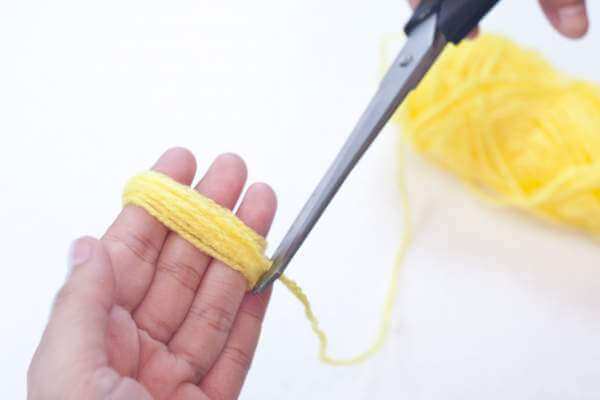
Step 10: Wrap the yarn tightly around your fingers. A tassel will be created as the hanging object of the clock’s pendulum, so you can use two, three or even four fingers for this to create a size that would fit your preference. Remove the yarn when you reach a considerable thickness of the yarn with your fingers.
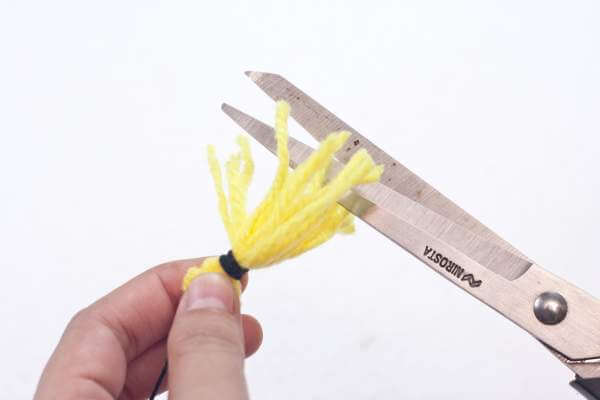
 Step 11: Wrap one end of the yarn with a crochet thread and cut the opposite end of the yarn to create loose ends. Trim some yarn pieces to obtain a uniformly cut tassel. Repeat this process to make an entire second tassel. The crochet thread on one tassel piece should be longer compared to the other tassel. Tie the two tassels together, creating loops on the ends of it.
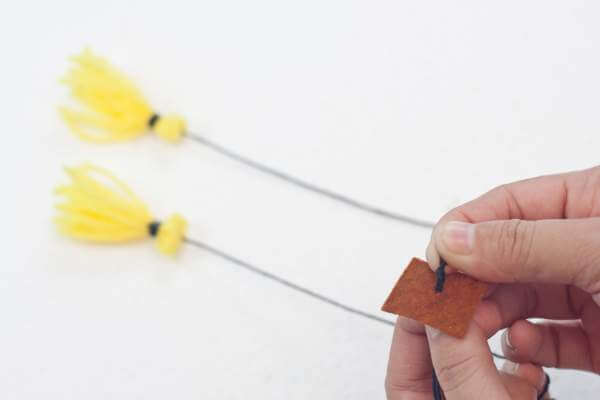
Step 12: Cut a small brown felt square and create a hole in the middle. Insert the looped end of the tassel’s crochet thread into the hole in the square felt. Generously place a glue on the square felt since this will assist the hanging of the weights from the clock body.
Step 13: Quickly place the brown square with tassels on the inner, middle portion of the clock’s roof. Hold the brown felt in place until the glue has dried.
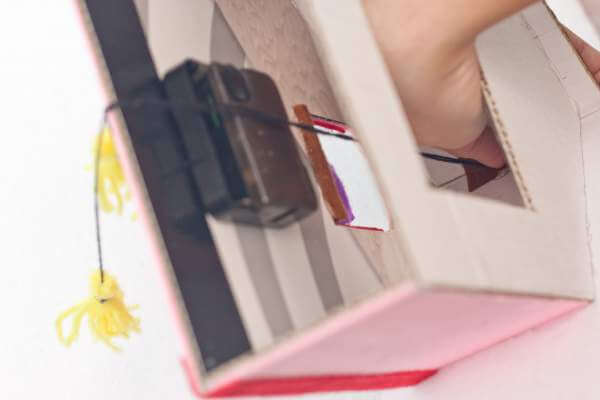
Step 14: Place and generously glue the soda can tab on the rear mid-upper portion of the roof. It will assist the hanging of the cuckoo clock to the wall.
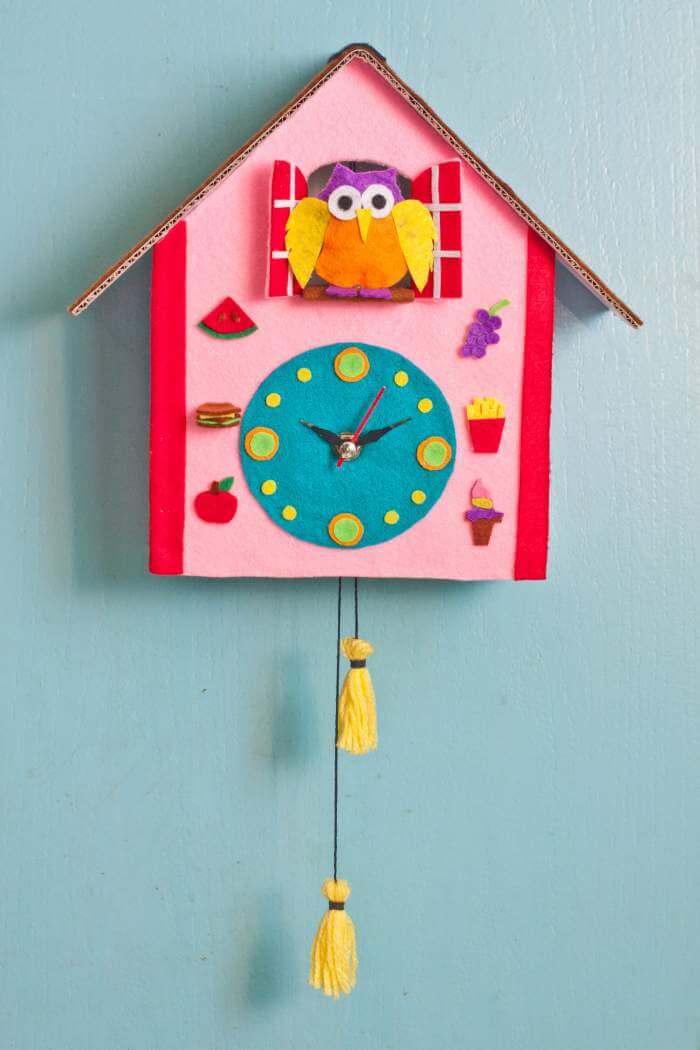
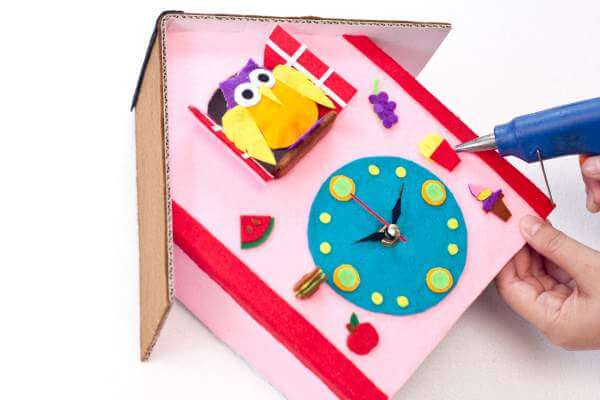
Step 15: Your DIY cuckoo clock is now finished and ready for hanging!
Congratulations and finally you have your own beautifully crafted DIY cuckoo clock. This is a DIY project that you and your kids should be proud of. Especially if you used your own unique colour scheme, you likely ended up with a very modern cuckoo clock. The cuckoo clock can be placed on your daughter’s/son’s bedroom or even in your living room or kitchen. Just add a battery to the clock through the hole in the back and you are good to go. You may also change the overall design of the clock especially if your daughter wants some flowers on it or your son wants some stars and moon on it - anything is possible just as long as you are creative enough to explore. The design possibilities are endless.
Had fun creating this cool DIY project? Why not share us your work and who knows? Maybe we can feature it sometime. Can’t wait to see your beautiful outputs!
Your kids may have just created a craft so nice, you might even be interested in buying a cuckoo clock yourself!